jerryxugit-2026/dsh-web-companion ↗★ 0
dsh-web-companion
DSH Web Companion — Chrome side panel that embeds the local DeepSeek Harness agent GUI and attaches pages to it 适合浏览器内直接采集或操作页面的用户,需安装扩展并在本机运行服务
インストール
検証済み bundle がないか、互換性チェックに失敗しています。先にリポジトリの説明を読んでください。 README 全文を読む ↗
ドキュメント
README 全文を読む ↗DSH Browser Companion
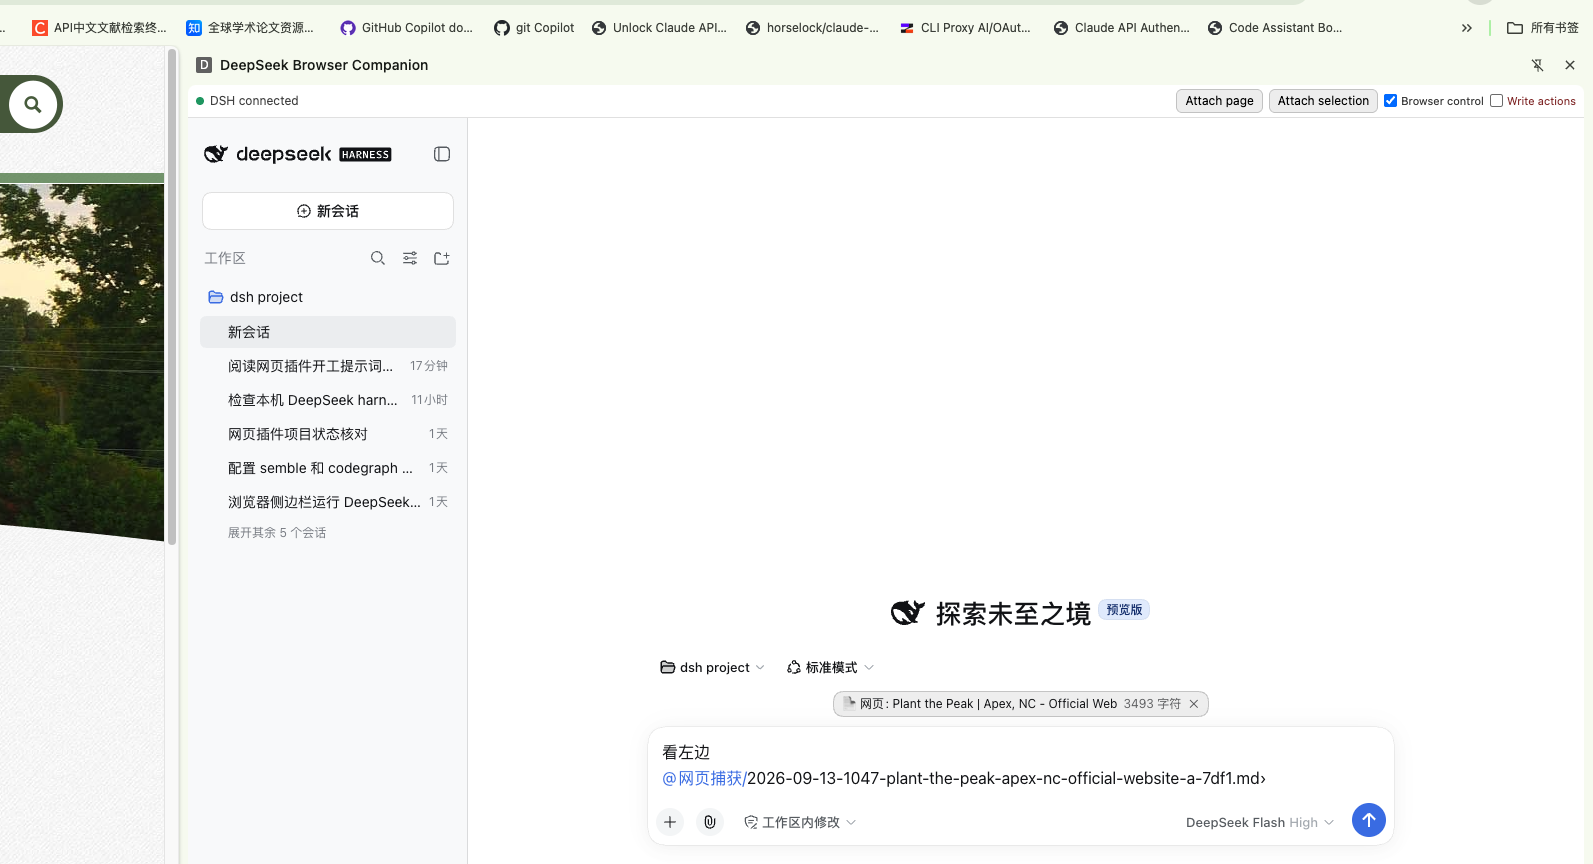
English (this section) · 中文 · Install guide · 安装部署
An AI agent that sits next to the web page you are looking at, in the Chrome side panel. It reads the page for you, and — when you turn that on — it also works the page: fills forms, translates, clicks, collects things from several tabs into one place.
It runs on your own computer (through DeepSeek Harness). Nothing is sent to a third-party browser service.
What you actually do — three things, nothing else:
- Download and unzip it — see Step 1 below.
- Run two commands in the Terminal — the wizard asks you before every change, and asks for your DeepSeek API key once.
- Load the extension in Chrome — the wizard tells you exactly which folder to pick.
Everything else — including building the extension — the wizard does for you. No compiler, no Xcode, no developer tools: only Node 22 or newer.
Background: why I built this
I am Jerry. I found that a browser side panel plus an AI agent solves a big class of everyday "doing things on the web" problems — the ones that used to mean copying and pasting back and forth:
- Filling in forms — applications, sign-ups, tax and registration forms.
- Translating a page — keeping the layout and the terminology consistent, not just word by word.
- Summarising a long page — a 50-page policy, a long thread, a documentation page.
- Collecting from several tabs — compare one product on three shops, gather addresses from five pages.
At first I used a Chrome + ChatGPT extension, and it was genuinely great. But I noticed that many people in China cannot use ChatGPT, while DeepSeek 4.1 Flash is already very good and is available in China. Yet DeepSeek Harness had no such extension. So I built this one.
That is the whole reason: the experience I liked, made usable by the people around me, running locally.
What you can do with it
You open the side panel, and you have an agent that can see the page you are on.
- Ask about the page you are reading. "What does this contract actually commit me to?" "Summarise this in five points." No copying, no pasting — the page is already in front of it.
- Fill a form. Give it a form page and tell it what you want to say; it reads each field, understands what goes where, and fills it in. It asks you before it changes anything.
- Translate. The whole page, or just the part you highlighted — with consistent terminology.
- Summarise something long. Long policy pages, forum threads, docs: get the parts that matter, then ask follow-up questions about them.
- Collect from several tabs. "Compare this product on those three shops." "Get the address from each of these five pages." It gathers them into one answer or one table.
- Hand it what you are looking at, three ways. The page, the text you selected, or a screenshot (for charts, canvases, PDF viewers — things that are not text). There is also a right-click menu, and if you type 「看左边」 (or "look left") in the chat it grabs the page in the other tab by itself.
- Let it actually click and type. Turn on the write operations switch and it can fill, click, select, scroll and navigate — the things that finish a form or walk through a wizard. Every single one of those actions is confirmed by you first, unless you deliberately turn asking off (in which case they are refused instead of quietly allowed).
Everything it captures is saved in your workspace as a normal Markdown file, and referenced in the chat as
@网页捕获/….md — so you can read, edit, keep or delete it like any other file.
How it works
┌──────────────────────────── Chrome ────────────────────────────┐
│  the page you are on                side panel                 │
│  ┌──────────────┐                  ┌─────────────────────────┐ │
│  │  web page    │                  │ Companion panel         │ │
│  │              │                  │ page / selection / shot │ │
│  └──────┬───────┘                  │ control / write switch  │ │
│         │ reads the page           └───────┬─────────────────┘ │
│         ▼                                  │ shows the DSH UI   │
│  ┌──────────────────────┐         ┌────────▼─────────────────┐ │
│  │ extension background │         │ DSH chat UI (in a frame) │ │
│  └────────┬─────────────┘         └────────┬─────────────────┘ │
└───────────┼────────────────────────────────┼───────────────────┘
            │  local connection              │  local connection
            ▼                                ▼
   ┌──────────────────────────────────────────────────────────┐
   │  DeepSeek Harness — running on your computer             │
   │    └ the Companion plugin (inside DSH)                   │
   │       · talks to the browser                             │
   │       · gives the AI its browser abilities               │
   │       · asks you before any change is made               │
   │       · saves the captures and keeps a local log         │
   └──────────────────────────────────────────────────────────┘
            ▲  lets Chrome start DSH when it is not running
      ┌─────┴──────┐
      │ small      │
      │ launcher   │
      └────────────┘
Three small pieces, all on your machine:
- The Chrome extension — the only part that can touch web pages. It is built on your computer when you install, with your own settings baked in.
- A plugin inside DeepSeek Harness — it lives in the same process as your local DSH, gives the AI its browser abilities, gates the changes, and keeps the log.
- A small launcher — so that clicking the extension can start DeepSeek Harness for you if it is not running yet.
Why it is built this way
The easiest possible version would be: put DSH in the side panel, type "look left", grab the page text. I did not stop there, because that version only reads:
- Reading is not enough. Filling a form and translating a page are things you do. A read-only version has nowhere to put "click here", "type this", "wait for the page" — and nowhere to ask you first.
- One big dump is not always what you want. Sometimes it is the text you selected, sometimes a picture of a chart, sometimes a page made of controls rather than text. So there are three separate ways to hand it over, instead of one hidden behaviour.
- Only the extension can reach the page. A page shown inside a frame cannot read other tabs or other sites. So the extension is the hands, and DeepSeek Harness is the brain.
- Changes need permission and a record. Anything that modifies a page goes through a confirmation, and every capture is written to a local log. "The AI quietly clicked something" is not acceptable.
Is it safe?
The short version: it all runs on your computer, and nothing happens without your consent.
- No third-party browser service. Your extension reads the page and hands it to your local DSH process. There is no company in the middle.
- Nothing is exposed to the network. The plugin listens only on your own machine, and does not talk to the internet.
- Only your browser can talk to it. The connection requires a secret pairing key that is generated on your machine, and it checks that the caller really is your extension. A random web page cannot reach it.
- Your extension's identity is pinned, so another extension cannot impersonate it.
- Write operations fail closed. If asking is not possible — or the session is set to never ask — the action is refused, and it tells you it was the setting, not a person, that said no.
- Every change is asked for, and recorded, in a local log you can read.
- No secrets in this repository: no keys, no pairing file, no built extension. The build checks this.
Getting it, and installing it
Step 1 — download it (click by click, no GitHub experience needed)
You do not need the green Code button, and you do not need git. GitHub has a page made for
exactly this: Releases. Here is what to click.
-
Open this page —
(Or open the project page and click Releases, in the right-hand column.)
-
You will see the newest entry at the top (currently v3.47.3). Click its title.
-
On that page, scroll to the very bottom — the last section is called Assets. Under it, click the one that says
Source code (zip). A.zipfile starts downloading. (IgnoreSource code (tar.gz)unless you know you want it; ignore everything aboveAssets.) -
Find the downloaded file — usually in Downloads — and double-click it to unzip. You get a folder whose name starts with
dsh-web-companion. Move it somewhere you will find again (your home folder is fine).
(Comfortable with git? git clone https://github.com/jerryxugit-2026/dsh-web-companion.git
gives you the same thing.)
What you are downloading (and what you are not): only the project's own source. There is no
node_modules, no pre-built extension, and no keys inside. That is why the download is small.
Do I have to compile anything? — No
There is no build step for you, and nothing gets downloaded behind your back. You install the two prerequisites yourself with copy-paste commands (below); the wizard then checks them, tells you exactly what is missing if anything is, and builds the Chrome extension for you (a few seconds). You never open a compiler, and you do not need Xcode or any developer tools.
The installer deliberately does not download or install anything. It used to decide by itself and
pull things in; that turned out to be wrong in practice — on a machine that already had DeepSeek Harness
installed from source, the check only looked at PATH, did not see it, and would have installed a
second copy. So now it reports: what is missing, where it goes, and the exact command to run. One
exception — the only thing it ever writes for a dependency is a symlink to an esbuild
you already have, instead of downloading one. And if a dependency is missing it stops before writing a
single file.
Why is the extension not already built inside the download? Because the build bakes in your DSH port and your pairing key. A pre-built copy would simply not work on your machine — so the wizard builds it locally instead.
Step 2 — run the installer
You need macOS, Node 22 or newer and Chrome.
Two things you install yourself first. The wizard checks them and tells you the exact command if one is missing — but it will not install them for you:
# 1. DeepSeek Harness — the host program the plugin lives inside.
#    Pin the version: npm's `latest` for its sub-packages is a broken stub.
npm install -g @deepseek-ai/dsh@0.1.5-rc.2

# 2. esbuild — used once, to build the Chrome extension (~11 MB).
#    The wizard prints the exact command for your folder if it is missing.
npm install --prefix "/extension" esbuild
Already have DeepSeek Harness from a source checkout (a git clone with no node_modules)? That is
source, not a working install — build it first, or leave it alone and install the published package as
above. If you run it from a custom location, point the wizard at its launcher: --dsh .
Getting the Terminal into the right folder (the part everyone gets stuck on):
- Press
Cmd + Space, typeTerminal, press Enter — a black window opens. - Type
cd— the letters c, d and one space — then drag the unzipped folder from Finder into that window (the path types itself), and press Enter. - Now run:
node bootstrap/install.mjs          # dry run: it only prints what it *would* change
node bootstrap/install.mjs --apply  # the real thing: it asks you before every step
The one typo nearly everybody makes: the file is bootstrap/install.mjs — with a slash,
because install.mjs sits inside the bootstrap folder. bootstrap.install.mjs (a dot) is not a
file, and Node answers Cannot find module. Let it type itself instead: type node boot, press
Tab (it completes to bootstrap/), type in, press Tab again, then Enter.
An absolute path also works from any directory:
node /full/path/to/dsh-web-companion-3.49.1/bootstrap/install.mjs
The wizard will ask you two things before it does anything — where to install the program, and where your DSH data lives. Both come with a sensible default, so just press Enter twice:
? 本程序安装到哪个目录? [/Users/you/Downloads/dsh-web-companion-3.49.1]   ← press Enter
? DSH 数据目录(配对钥匙/凭据放这里)? [/Users/you/.dsh]                            ← press Enter
(The two prompts are in Chinese — the installer is a terminal program written for this project.
It installs into the folder you unzipped — that is the default, and it is safe. The wizard keeps
the sources where they are and adds what it needs next to them (node_modules, the built extension,
a launcher). So the program lives in a folder you can see and delete, instead of scattering itself
somewhere you would have to hunt for. If you would rather put it elsewhere, pass --install-dir
or type a path at that prompt.)
Then, once:
- In Chrome, open
chrome://extensions, turn on Developer mode, click Load unpacked, and choose theextension/distfolder the installer just built for you. - Click the extension icon to open the side panel — that is your agent's window.
- Restart DeepSeek Harness (
dsh web) so it picks up the plugin, then check everything:
node bootstrap/doctor.mjs # verifies DSH, pairing, the built extension, connectivity
The installer asks you where to install and where your DSH data lives. It checks Node, DSH, Chrome and the
port; installs DSH if it is missing; builds the extension on your machine; adds one line to your DSH
settings (after backing it up); and then verifies the result. To remove it again:
node bootstrap/uninstall.mjs.
(Windows is not supported. The installer says so and stops, rather than pretending.)
For engineers
Design docs, the changelog and the ledger live in docs/. The model-facing tools are
browser_read, browser_tabs, browser_wait, browser_screenshot, browser_ax, plus gated write
operations; the two local channels are /ag/agent (extension) and /ag/client (DSH page).
npm run check runs the whole gate suite; npm run probe:all runs the real-Chrome probes.
DSH Browser Companion(中文)
English(见上) · 中文(本节) · 安装说明 · 安装部署
一个 AI agent,就坐在你正在看的网页旁边 —— 在 Chrome 侧边栏里。它替你读页面,在你同意时也替你操作页面: 填表、翻译、点击、把好几个标签页里的东西收拢到一处。
它跑在你自己的电脑上(通过 DeepSeek Harness),网页不需要交给任何第三方的浏览器服务。
你实际要做的 —— 只有 3 件事:
- 下载并解压 —— 见下面「第一步」。
- 在终端运行两条命令 —— 向导每改一处都会先问你,并会问你一次 DeepSeek API key。
- 在 Chrome 里加载扩展 —— 向导会告诉你具体该选哪个文件夹。
其余全部(包括构建扩展)都由向导自己做。不需要编译器、不需要 Xcode、不需要开发者工具, 只需要装好 Node 22 或更高版本。
开发背景:为什么做这个
我是 Jerry。我发现浏览器侧边栏 + AI agent 能解决一大类"上网办事"的问题 —— 那些以前只能来回复制粘贴的事:
- 填表 —— 申请、注册、报税与登记类表单。
- 翻译网页 —— 保持版式与术语一致,而不是逐词硬翻。
- 长页面总结 —— 几十页的条款、很长的帖子、一篇文档。
- 跨标签页收集 —— 在三家店比一个商品、从五个页面里收地址。
我最开始用的是 Chrome + ChatGPT 的插件,确实非常好用。但我发现很多人在国内无法使用 ChatGPT, 而 DeepSeek 4.1 Flash 已经非常好用、国内可以直接用。可是 DeepSeek Harness 没有这样的扩展程序。 于是我自己做了这个。
理由就这么简单:把我喜欢的那种体验,做成身边的人能用、而且跑在本地的东西。
你能让它做什么
点开侧边栏,你就有了一个看得见当前页面的 agent。
- 就着当前页面问它。 "这份合同到底让我承担了什么?""用五句话总结这一页。" 不用复制粘贴,页面已经在它眼前。